After a Simple Workflow has both Processes and Resources added to it, Resource Calculations can be added. The Resource Calculations screen is going to look and function very similar to the Processes and Resources Screens. You will still be able to add, edit and link Processes, as well as add Resources from this screen. Click here to learn more about adding Processes to a Simple Workflow, and click here to learn more about adding Resources to a Simple Workflow.
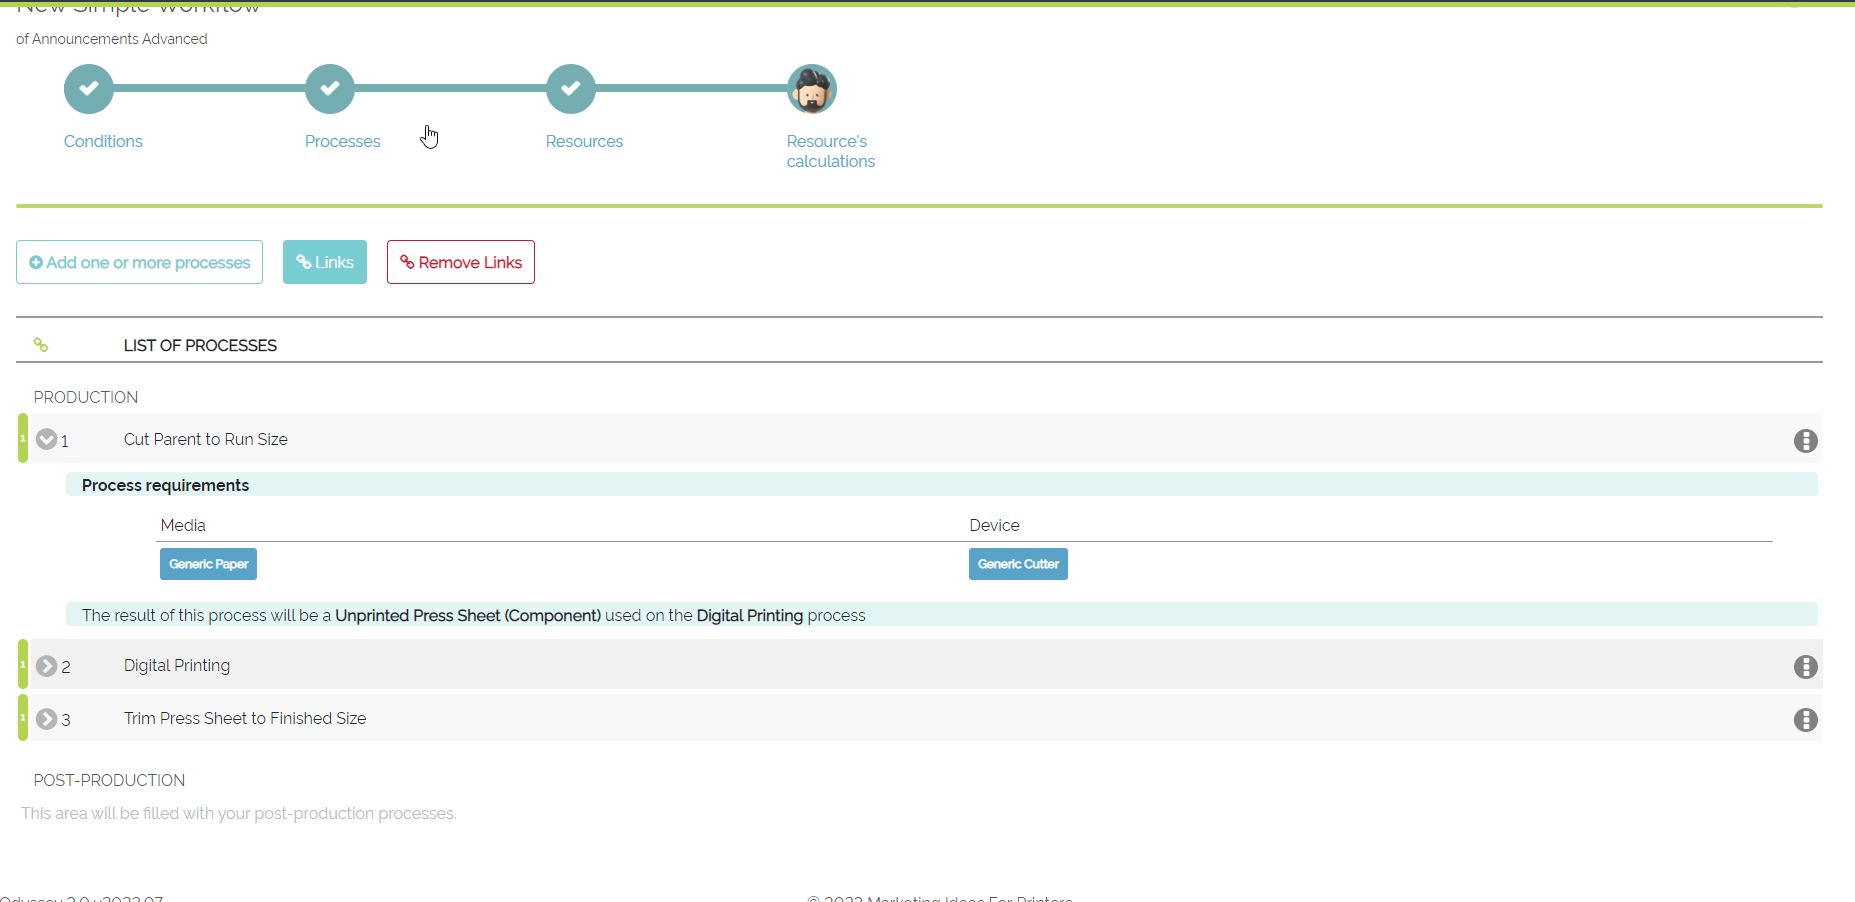
Example of the main Processes Screen with Processes Added
To work on Resource Calculations on this screen, simply select the Resource you wish to add calculations to. Clicking this button will take you to the "Resource Pop-Up" first seen on the Resources screen. However, there will now be a Calculator Button next to all of your Resources that will take you to the "Resource Calculator".
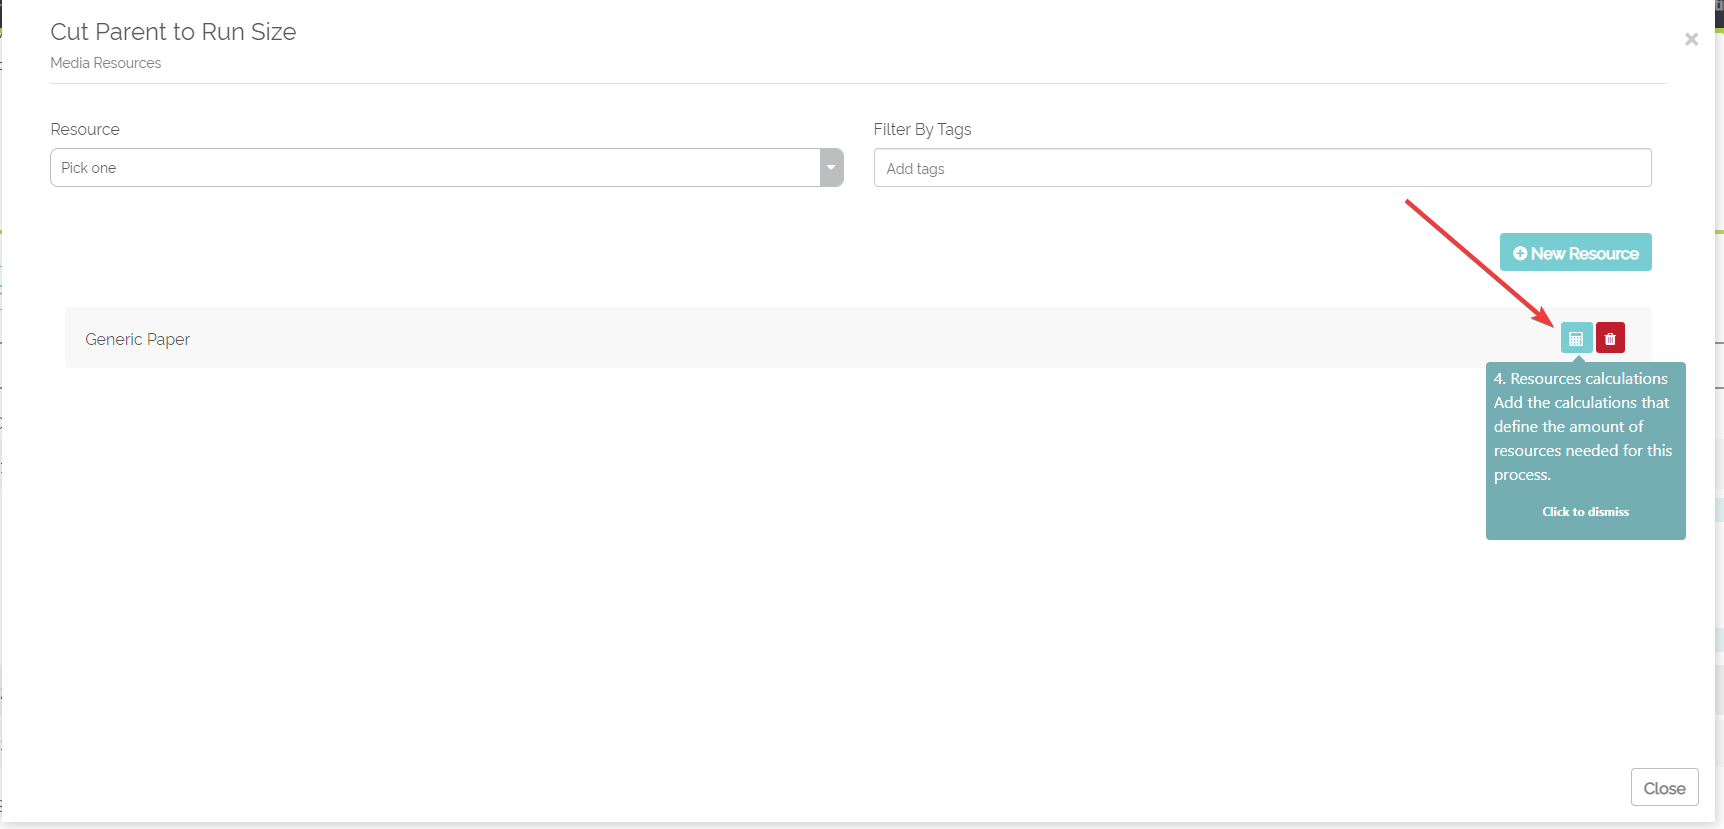
Example of the Resource Pop Up With the Calculator Button
Once on the Resource Calculator Screen, it is time to add the Calculations. A user may add Calculations Based on a Quantity Order, or enter in a Custom Quantity.
To add Calculations Based on a Quantity Order:
-
Select the drop-down arrow in the 'Quantity From' box to select the Resource.
- Enter in the number of <cuts, folds, clicks, etc> needed under 'Required Quantity'
- Enter in the number of units under 'Unit'
- Select 'Save Calculation'
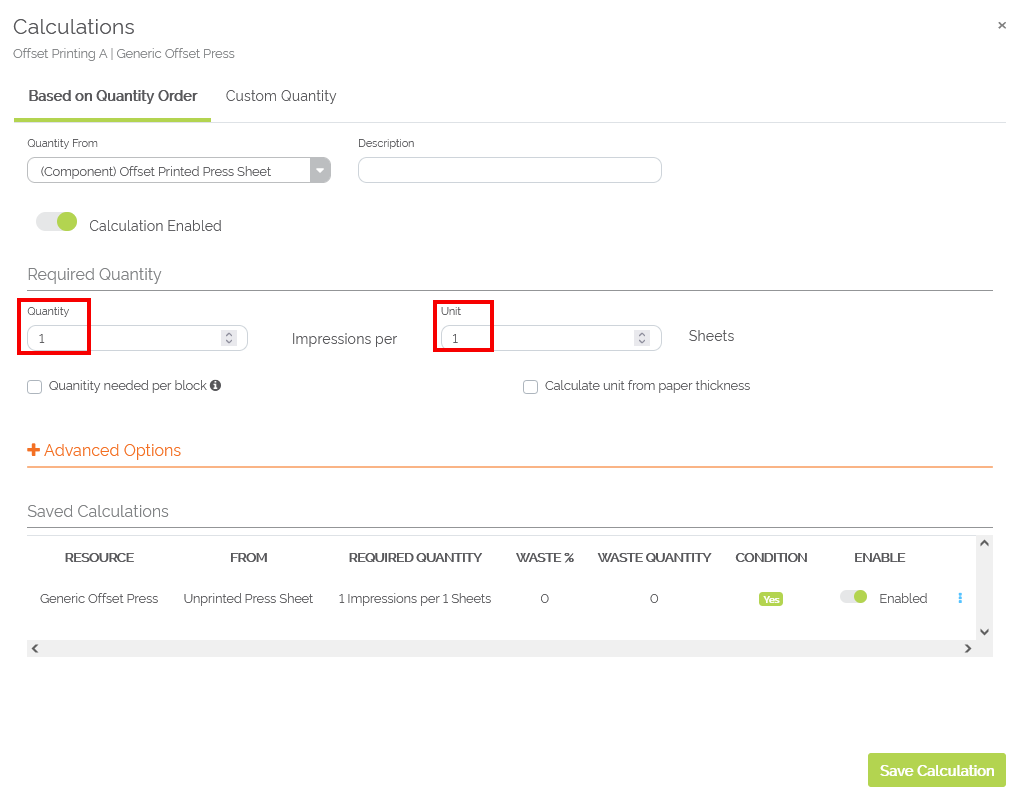
Example of Calculations Based on a Quantity Order
To add A Custom Quantity:
- Select the "Custom Quantity" tab at the top of the Resource Calculator
- Enter in the Calculation Name
- Enter in the number of units under 'Quantity"
- Save the Calculation
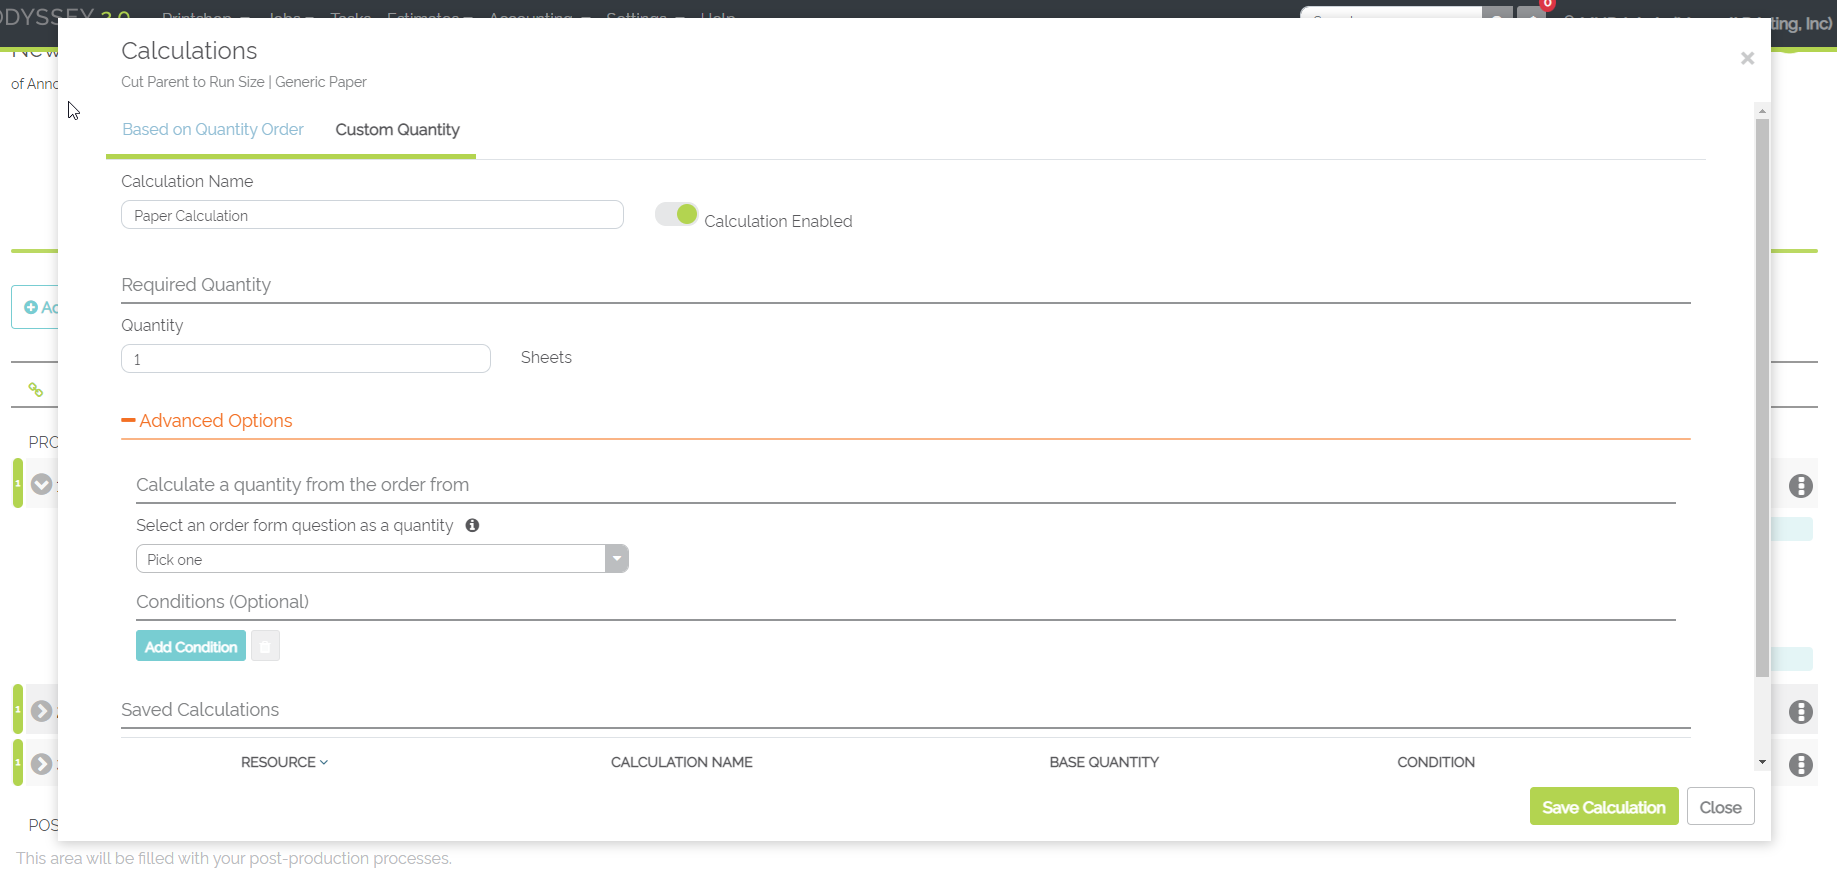
Example of a Custom Quantity
Advanced Options
Within the 'Resources Calculations' pop-up modal is an 'Advanced Options' section. Within this section, a user can add/edit three different areas that affect calculations: Waste, calculating a quantity based on another order form question, and conditions.
Waste: If a calculation needs to have waste taken into consideration, a user can add in waste as a Quantity or as a Percentage.
Let's use an example of a digital printer needing waste to be taken into consideration using the 'Quantity' part of the Waste.
Below is an example where a quantity of 25 clicks is being taken into consideration as waste for this calculation. A user could also use the 'Percentage' to have Odyssey calculate waste, such as 25%.
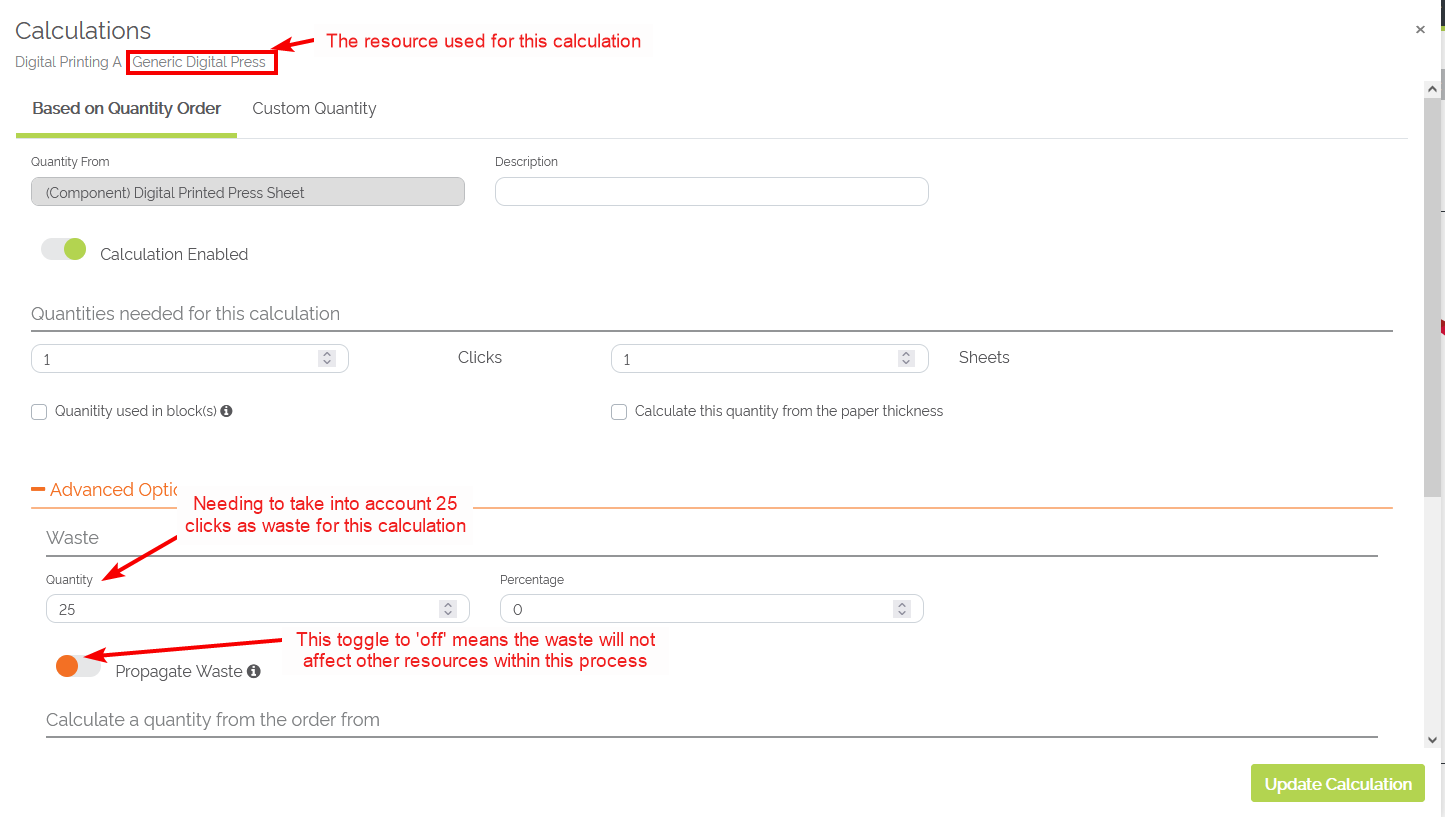
Example of Odyssey using the 'Quantity' part of waste as part of the calculation
The toggle next to 'Propagate Waste' allows a user to propagate waste to all other resources as part of the process or to only keep the waste calculation for this particular resource. In this case the 'Generic Digital Press' resource is only affected by the waste.
Calculate a quantity from the order form: Users may need to have Odyssey multiple the 'Quantity' question by another question on the order form to come up with a quantity for calculation purposes. The final quantity of the workflow will still be based on the quantity entered or selected from the order form's 'Quantity' question.
Let's look at an example for a 'Blueprints' order form. The order form looks like this:
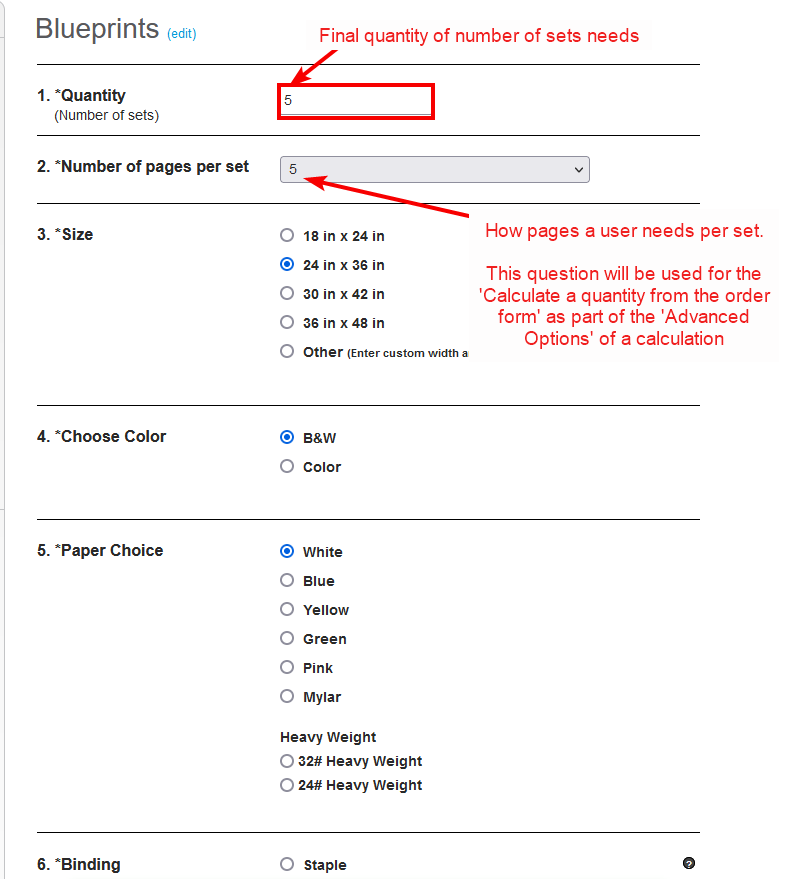
Example of a 'Blueprints' order form that will be using two different questions for calculations
The 'Calculate a quantity from the order form' looks like this within 'Advanced Options':
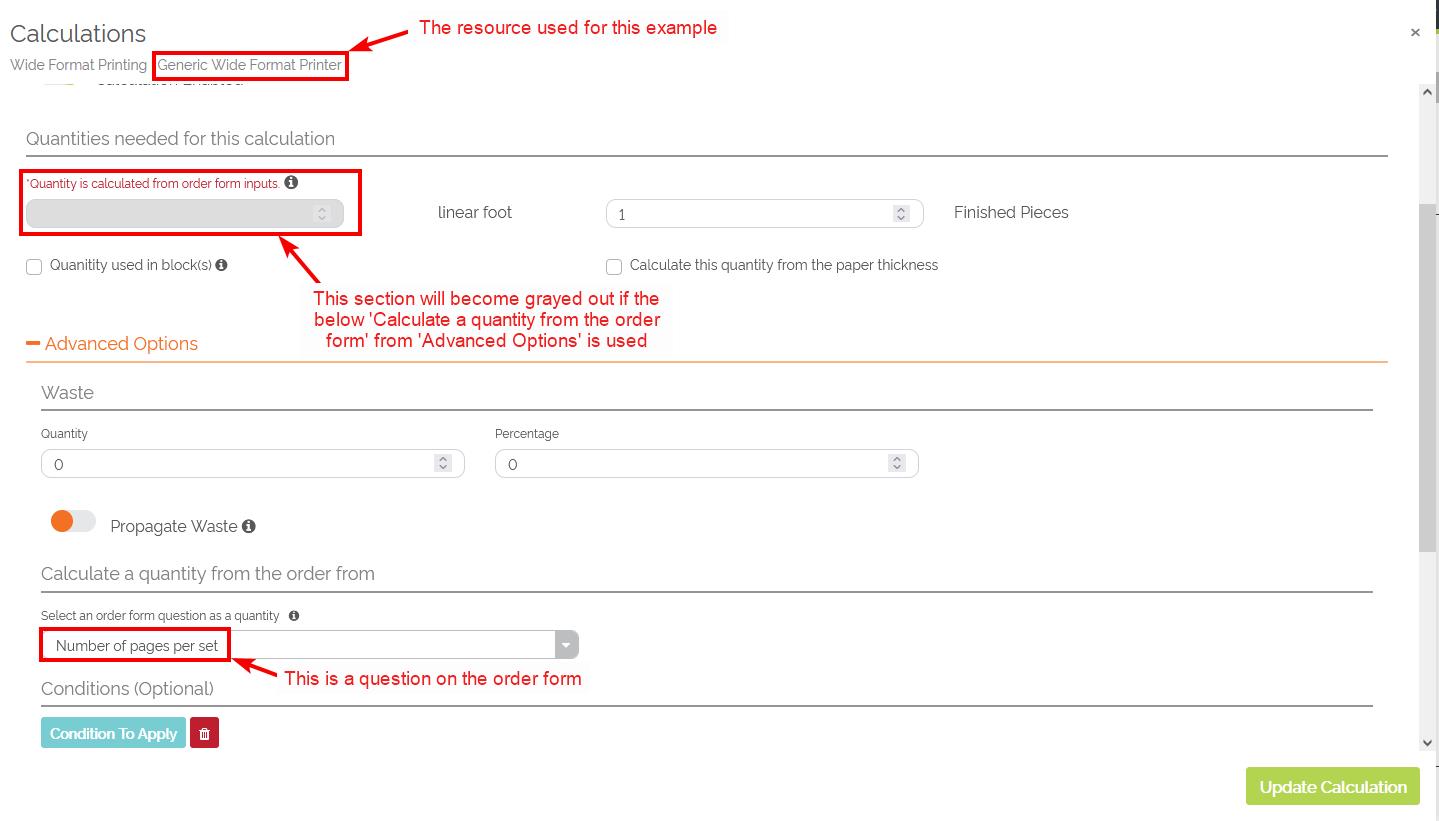
Selecting the 'Number of pages per set' question (from the order form) within 'Calculate a quantity from the order form' area of 'Advanced Options'
Conditions: Users needing to add Conditions for a resource within a process will do so within the 'Advanced Options' area of the 'Calculation' pop-up modal of a resource.
- Select 'Conditions To Apply' to access the 'Conditions to Apply' modal within 'Calculations'.
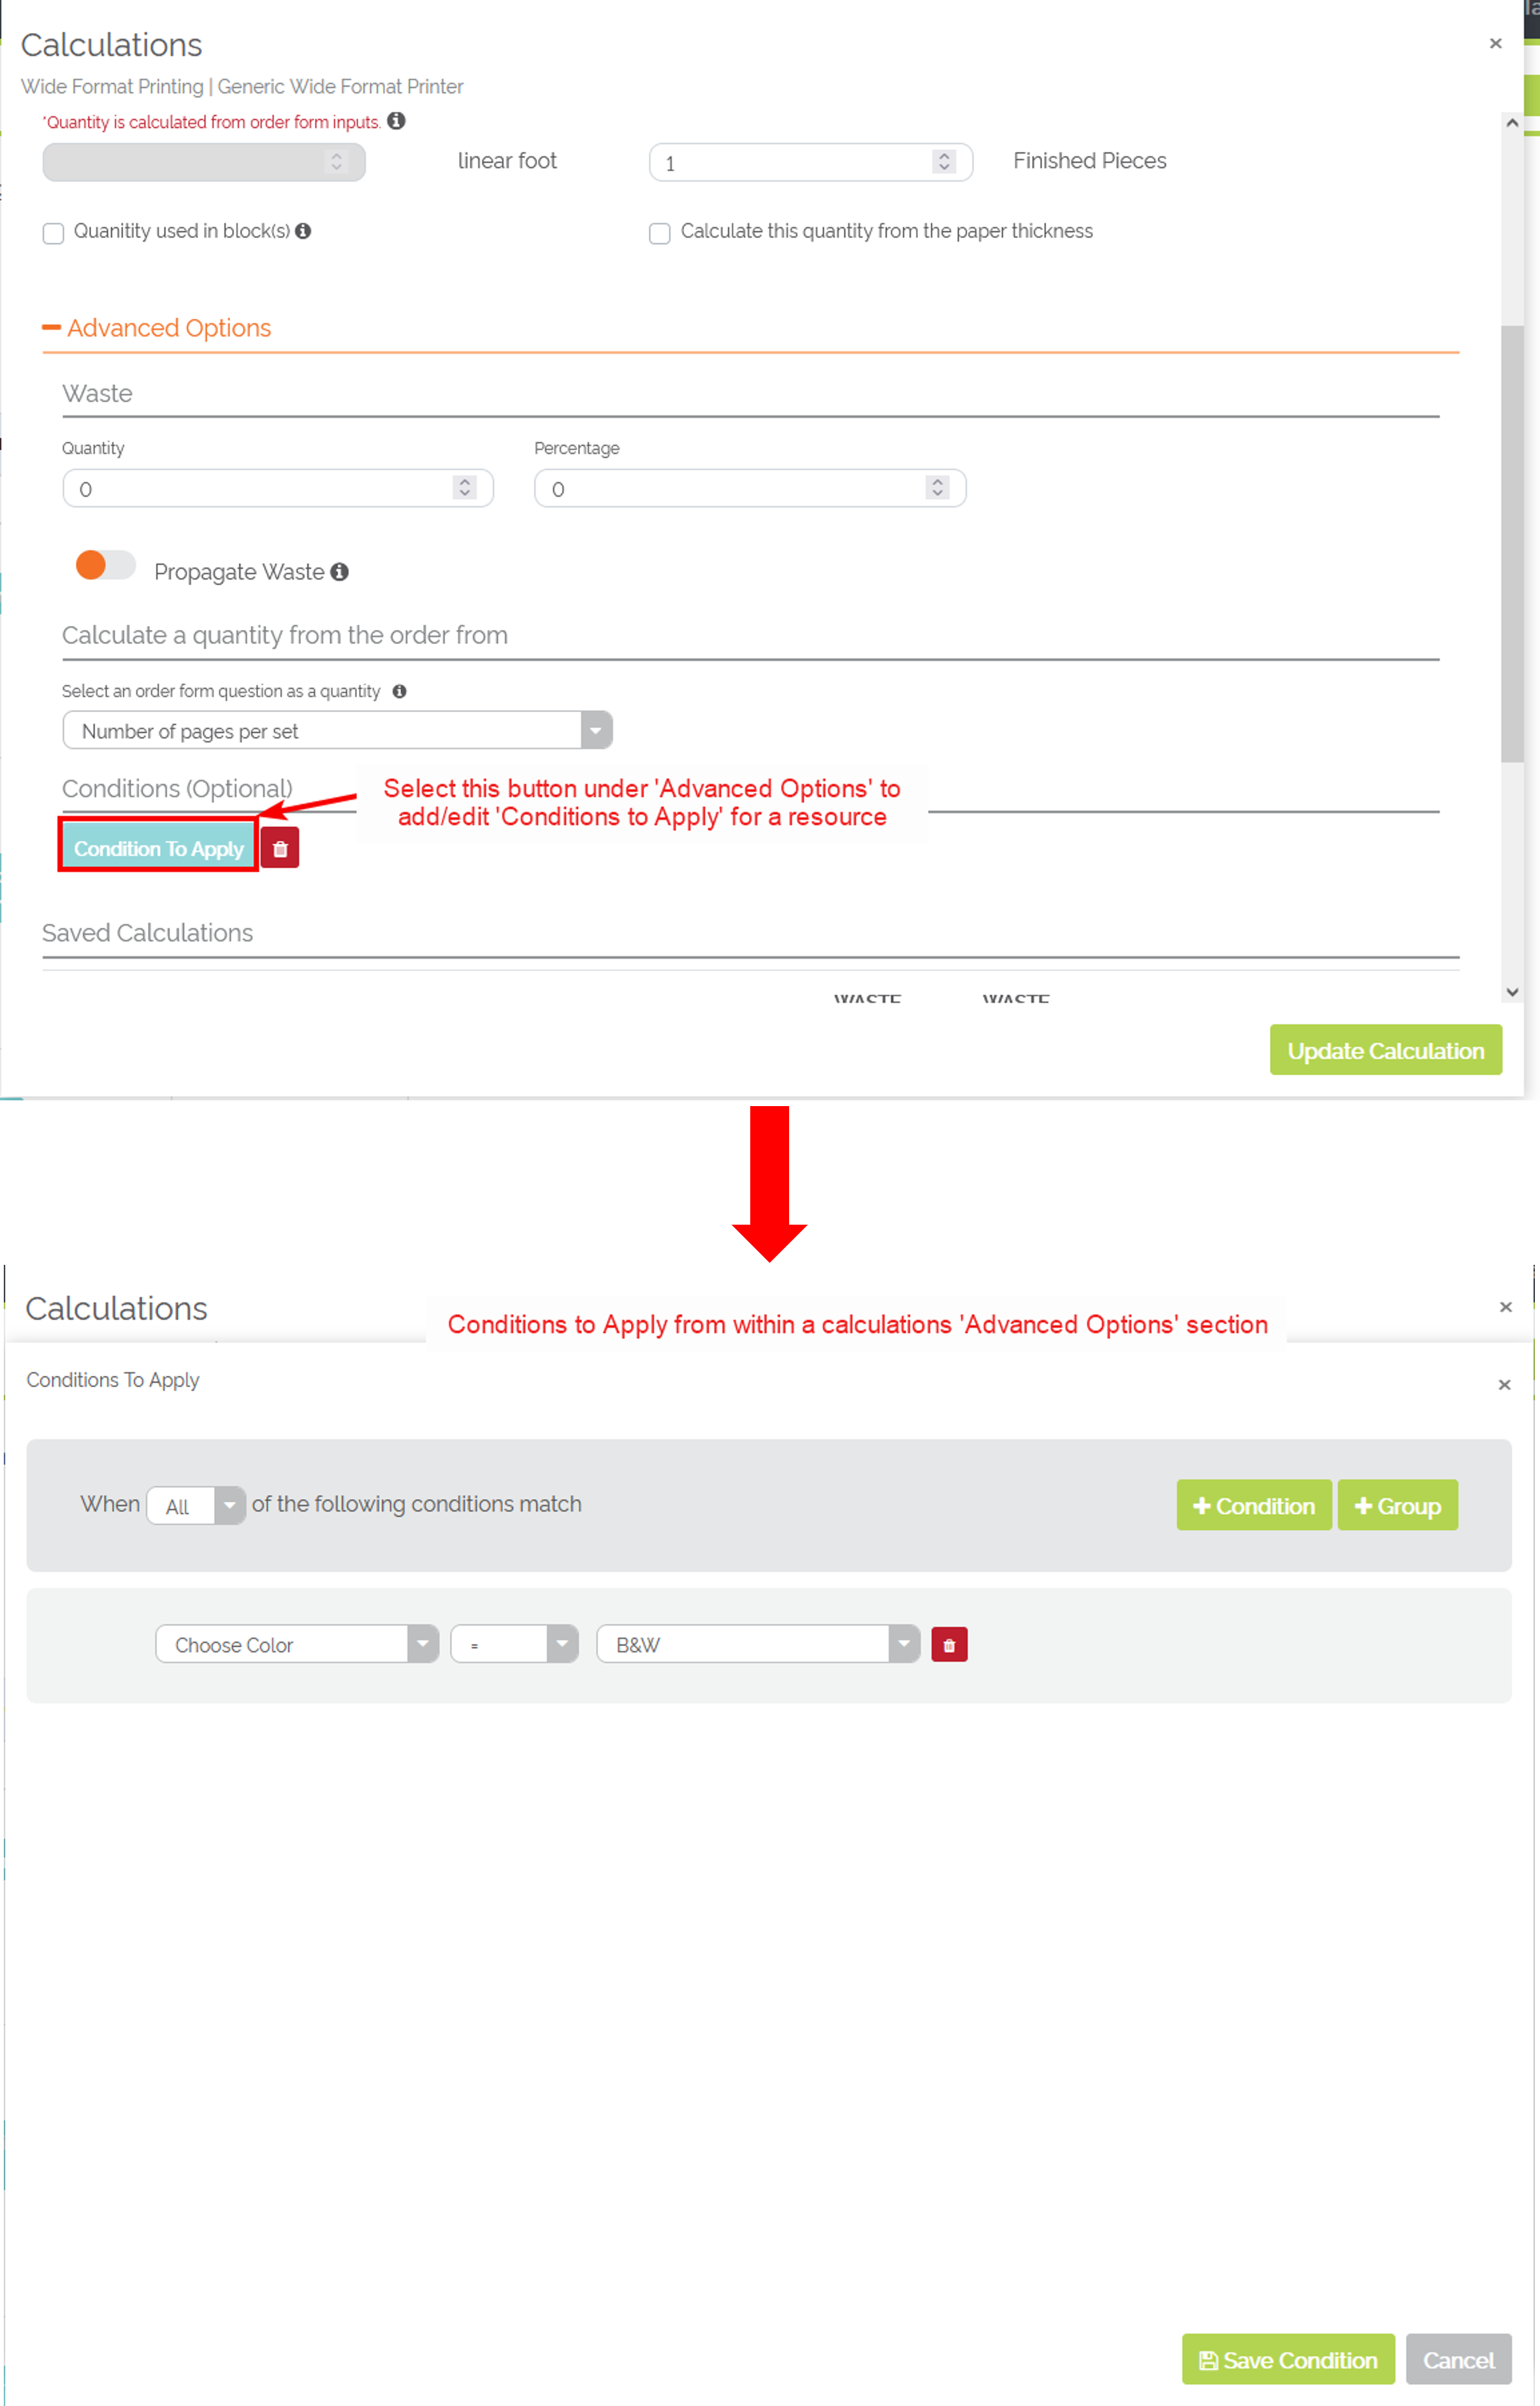
Accessing 'Conditions to Apply 'from 'Advanced Options'
To add/edit 'Conditions To Apply, continue to this section of the User Guide as part of the 'Conditions To Apply' pop-up modal of a workflow
Once calculations for one Resource are setup, the user may then repeat this processes for all remaining Resources requiring Calculations. Once all Calculations have been added to the Simple Workflow, select the "Next Step" button to continue on. At this point, the Simple Workflow is created. A user will be able to edit a Simple Workflow at anytime after it has been created. Follow along here to see how to edit an already existing Simple Workflow.