09 - Setting up Shipping Options for your customers
Getting Started

Written by Justin Carlson
Updated at September 18th, 2026
Table of Contents
Setting up shipping and delivery options takes two steps: first, create the options your website can offer; then, choose who can use each one. For example, you might offer Pick up' to all printbuyer and reserve a local delivery option for certain accounts.
Courier services such as UPS, FedEx, and USPS are configured separately under My Website → E-Commerce Settings → ShipLeap Connection. Preferred Client rates are also managed there. See the ShipLeap settings guide for instructions.
Create a shipping or delivery option
- Choose "My Website" from the Control Center's top menu.

2. Select "E-Commerce Settings" from the sidebar menu.

3. Select "Shipping & Delivery Options" From the E-Commerce Settings menu.

4. Choose "Add a New Shipping Option".

5. Fill in the information for the new shipping option
- Shipping Option: Enter a descriptive name for your internal use. Printbuyers do not see this name.
- Displayed As: Enter the name printbuyers will see. For example, an option named “VIP Delivery” internally could display as “Local Delivery.”
- Shipping Totals: Select Flat Rate Shipping Total or Calculated Rate per Pound to enter the corresponding rate. Rates per pound use the product weight set in its shipping weight calculator.
- This is a pickup option: Set this to Yes when a shipping address is not required. Leave it off for delivery options that need a shipping address.
6. Click "Create New Shipping Option" button in the lower right .

Edit or delete an option
- Choose "My Website" from the Control Center's top menu
- Choose "E-Commerce Settings" from the sidebar menu
3. Choose "Shipping & Delivery Options" From the E-Commerce Settings menu
4. Click the ‘edit button’ to the right of the shipping option needing to be updated
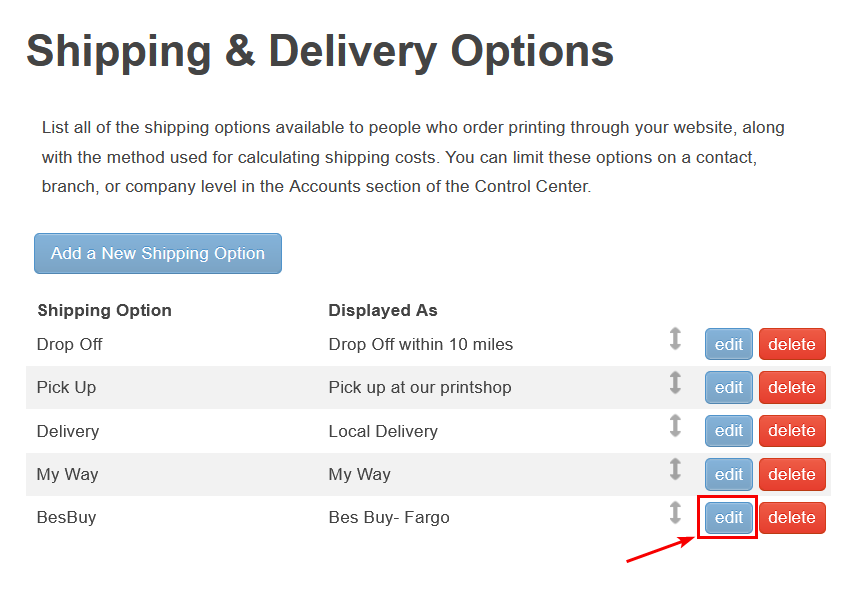
5. Edit the information as needed
- Shipping Option: Enter a descriptive name for your internal use. Printbuyers do not see this name.
- Displayed As: Enter the name printbuyers will see. For example, an option named “VIP Delivery” internally could display as “Local Delivery.”
- Shipping Totals: Select Flat Rate Shipping Total or Calculated Rate per Pound to enter the corresponding rate. Rates per pound use the product weight set in its shipping weight calculator.
- This is a pickup option: Set this to Yes when a shipping address is not required. Leave it off for delivery options that need a shipping address.
- Note: changes are not retroactive -- previous orders using the original settings will still show those original settings
6. When finished, click "Update Shipping Option" button in the lower right.

1. Choose "My Website" from the Control Center's top menu
2. Choose "E-Commerce Settings" from the sidebar menu
3. Choose "Shipping & Delivery Options" From the E-Commerce Settings menu
4. Click the delete button to the right of the shipping option to be removed
Note: Deletions are not retroactive -- previous orders using a deleted shipping option will still show that option.
Make an option available to all printbuyers
1. Select "Accounts" from the Control Center's top menu
2. Select "Account Settings" from the side menu

3. Select "Shipping Options" from the side menu

4. Check each shipping option you want to make available to all printbuyers.

5. Click “save changes”.

Set shipping options for a company, branch, or contact
1. Choose "Accounts" from the Control Center's top menu
2. Choose "Account Settings" from the side menu

3. Choose "Shipping Options" from the side menu

4. Use the people search tool in the sidebar to find the company, branch, or contact you want to update. Enter a keyword to filter the lists, then select the correct account.

- Type any keywords into the first box to filter the company, branch and contact lists to display only accounts that match your input
- Then choose the Company, Branch or Contact you'd like to update from the filtered lists
- The search filter is thorough: "Smith" will return "Smith", smith, Smithsonian, blacksmith
- The boxes at the top indicate whether you are editing a Company, Branch or Contact (and which specific Company, Branch or Contact)

5. Select "Use the Shipping Options defined below"

6. Place a checkmark in the box next to any shipping options you'd like to make available to the company, branch, or contact

7. Click "save changes" to finish
